
Modifications (Mk.II) to a Powerstretch (and similar) Landing Net Handle (updated Oct '08)
By Paul Whiteing
By Paul Whiteing
Introduction
These Mk.II modifications are borne out of experience, and I have recently carried them out on my new longer handle, so (obviously) I consider them necessary and I urge you to consider doing them too - before you have a problem on the bank.
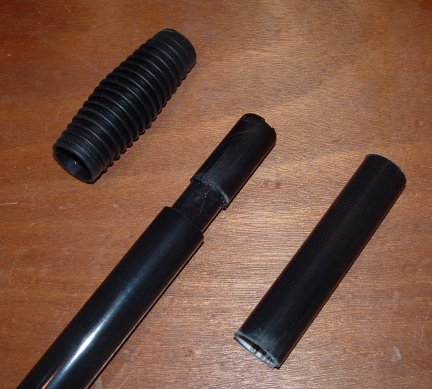
Handle (bottom) modification :
This modification allows the inner, including the fixed sleeve, to protrude from the bottom end of the outer as/when required for cleaning and lubrication (furniture polish), or on the bankside you can flush it with water.
1. Withdraw the inner tube by about half its length.
either :
2a. Ease off the rubber grip (difficult but possible).
2b. Carefully, with a fine toothed saw, remove about 4-5" from the bottom end of the outer handle where the grip was.
or (as suggested recently by someone else) :
3a. Carefully, with a fine toothed saw, cut through the outer handle close to the rubber grip.
3b. Using a mallet, hit the rubber grip to break the tubing inside it, and remove the pieces. Be very careful about splinters. Wash out the grip when all splinters removed.
then
4. Carefully clean up the cut edges with fine emery.
5. Push the inner back into the outer until the end is about 1" shy of the cut end.
6. Re-fit the rubber grip having cut the very end off, and insert a 1" long plug cut from some expanded polyethylene foam packaging - or, better still I've more recently found, purchase a foam pole-bung of the right size.
7. Add some white tape to the inner just above the lock lever, as a marker to show how far in the inner can be pushed when closed up.
Cutting about 4-5" off means that the inner will not retract fully home when collapsed, but leaves about 6 " proud - I favour this as it lessens the chance of dirt entering as you can wipe it more easily, and it also means that a 'flotation thingy' could be added to this length - but you can cut off less if you wish of course.
In the event that the handle locks, just remove the white tape and the grip, push the inner fully home (pushing the bung out) thus exposing the sleeve, wash and wipe to remove offending dust and grit, re-lubricate if possible, and re-assemble.
Handle (top) modification :
This modification strengthens the top where the boss is fixed to the inner, which has proved a weak point.
1. Drill out the rivet holding the threaded chrome/brass boss, and remove boss.
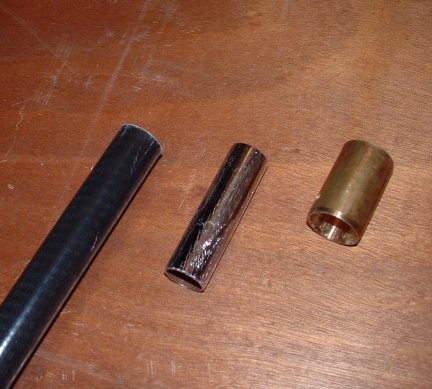
2. If the inner tube is showing signs of de-laminating, possibly at the rivet hole, carefully cut off about an inch from this end, and clean the inside bore (for glueing).
3. Find a 3-4" piece of suitable metal tubing (I used some 15mm chromed copper pipe which I happened to have and was a good fit), clean and deburr the ends to ensure it doesn't damage the inner tube of the handle, and roughen the surface. I've since been told that an old umbrella pole internal is also a suitable size, just remember to clean the aluminium well before glueing.
4. Glue this tube inside the inner of the handle using epoxy resin, and leave to dry, then fill the bore of the inserted tube with epoxy car body filler or similar.
5. Temporarily replace the boss and carefully drill through the existing hole in the boss (or make a new one if the inner was previously shortened), and right through the tube and out of the other side of the boss.
6. If necessary, wind some thin masking tape around the end of the inner tube to ensure the boss is a tight fit - be very careful to ensure the boss is fully home by tapping with a mallet as trapped air might act as a buffer, and the holes would not align.
7. Using a suitable M4 threaded (steel) screw and a nyloc nut, fix the boss in place. Since screws and nyloc nuts are not (easily) available in stainless steel it is a good idea to spray the screw/nut with red-oxide and then overspray in black. You can always replace the screw at the end of the season if rust is a problem.
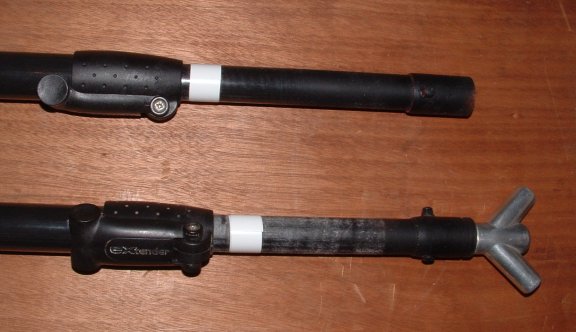
Finished job - latest handle (upper pic), original handle (lower pic)
paul (paul4barbus) whiteing
updated October '08