• You need to be a registered member of Barbel Fishing World to post on these forums. Some of the forums are hidden from non-members. Please refer to the instructions on the ‘Register’ page for details of how to join the new incarnation of BFW...

Fitting a Fuji Reel Seat

David Potter

Senior Member
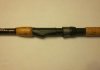
Some years ago I had a Fuji Reel Seat retro fitted to one of my float rods, this involved all the butt section rod rings being removed to slide the reel seat into position and the removal of the old sliding reel rings, although it done the job I wanted I have never been happy with the finish of the finished product.
I am wondering if things have moved on in recent years and there is a method of retro fitting a Fuji Reel Seat without removing the rod rings ?
As I have been using my Drennan Tench Float Rod quite a lot this season and am not happy with the way the reel is secured as it keeps coming loose
Any ideas or thoughts ?
Dave
 
Hello David . As far as I can see the only way to fit a new reel fitting would be to do as you describe , i.e remove the rings off the butt secton then ref fit from there
 
Done this a fair few times. You have a few options:
1. Do as you describe and fit the reel seat from the ferrule end 0f the rod. This will involve the removal of the rings and a section of cork.
2. Fit from the back - involves more cork removal than no1 and a bit of bodgery.
3. Fit a plate type seat.
4. Split a reel seat - some makes are more suited than others - not necessarily Fuji. This needs care.
I'd choose no1 as the most acceptable.
If you are going to fit a reel seat then fit a decent one. I've fitted KDPS, IPS, VSS and PB GBS to Drennan Tench Floats as well as the standard pipe type seats such as the DPS.
I have a number of Drennan Tench Float rods Mk1 to 3 really like them.Hope this helps,
Bob
 
Bob has laid out the options for you there David. Would just like to add that for the amateur rod builder option 1, although sounding initially more complicated, is probably easier than option 2. When fitting a handle in reverse you have to use cork with a parallel bore that will fit over the end of the blank - this means it will need packing underneath as you move up the taper of the blank towards the reel seat and all that packing ( be it masking tape or whatever ) will add to the weight of the finished handle. If done that way it would be best to source a pre formed full length cork as if done in sections it would need clamping and most clamps fit over the blank ( i.e. slid down over the blank without rings on ). To make matters worse nearly all the pre formed handles I've come across have a tapered bore! To make a decent job of it you'll probably want to replace the front part of the handle as well which may mean a new winding check and front whipping and by the time you've done all that you'll probably whish you'ld just taken the rings off and done it properly. ;)
 
I've fitted lots of reel fittings to replace the old style sliding rings - it's a pain of a job and previous forum posters have described how the job would normally be done.
I recently had an old Daiwa feeder rod and wanted to modify it to accept a Fox reel fitting that I'd salvaged from a broken rod. To make the job easier, I decided where the reel fitting would be positioned on the rod and where the centre of the fitting would be, I sawed completely through the butt. I then removed the corks on each half, equal to the length of the fitting. I then created a spigot from and old fibre-glass rod - this was thick walled and would be stronger than one made from thin walled carbon fibre. This spigot was about 100mm long and was araldited 50mm into one half of the butt blank and allowed to set. Aradite was liberally applied to the other half of the spigot and to the outside diameter of the rod butt where the corks had been removed - the reel seating and the two halves of the butt were then pushed slowly together, aligned and allowed to dry. Click on the attached thumbnail to see the modification.
I was initially worried about the drastic approach of sawing the butt in two, but as you can see, the finished job is fine. Moreover, the corks match, since there was no need to fit new ones and the rings on the butt section match the rest of the rod since the whippings have not been touched.
 

Attachments

  • 005.jpg
    005.jpg
    96.7 KB · Views: 340
Last edited:
Back
Top