
DIY Cage Feeders
by CronkYVoddy
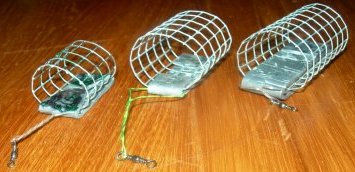
A few simple steps on how to make your own cage swim-feeders and save yourself £££s
by CronkYVoddy
A few simple steps on how to make your own cage swim-feeders and save yourself £££s
ITEMS YOU WILL NEED :
5mm Square mesh sheet (Available from Garden or Hardware Stores)
A pair of tin snips
A pair of pliers (regular and long nose if possible)
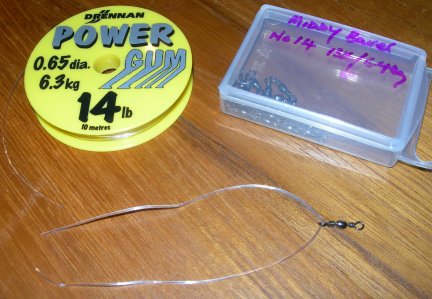
14lb clear 'Powergum' or Amnesia
Swivels (I use size 14's)
Roofers lead sheet (you can buy 'dead cows' from a tackle shop if you wish)
OPTIONAL :
A small file
Camouflage powder coating if required
A tube of approx. 20mm diameter will help in forming the feeders to shape
(A landing net handle or section of broom handle for instance)
If you use feeders a lot you may already know that you have to buy a multitude of sizes and weights to cover all eventualities. Whilst in my local tackle shop rooting through the feeders I wondered if the basic cage swim-feeder was something that could easily be made at home for a fraction of the cost of shop bought feeders.
It got me thinking ..... By making them yourself you have the added attraction that you can 'custom build' them to suit your own requirements. I will normally use only small feeders but I shall give you the measurements for small, medium and large. From there on the process is the same for any size. Only the amount of lead required will be different.
My measurements are intended as a guide only. You can easily adjust to suit your own preferences.
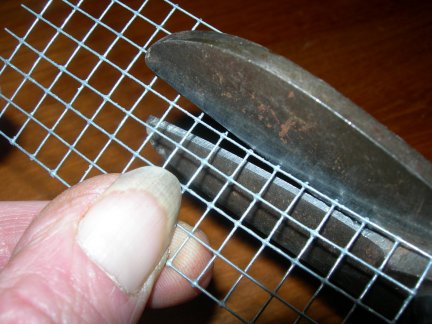
1. First cut long strips from the mesh sheet. For small feeders I cut strips 13 squares wide (80mm), for medium feeders 15 squares wide (100mm), and for large 17 squares wide . (This will determine the diameter of your feeder).Try to cut tight alongside one of the 'ribs' in the mesh so that you leave parts of the wire mesh sticking out. These will be bent over later to hold the feeder in shape. I find this easier if the 'rib' in the mesh you are cutting along is facing uppermost on the sheet as you cut. Cut to the right hand side of the 'squares'

A 13 square strip will make a feeder of approx. 20mm diameter
A 15 square strip will make a feeder of approx. 30mm diameter
A 17 square strip will make a feeder of approx. 40mm diameter
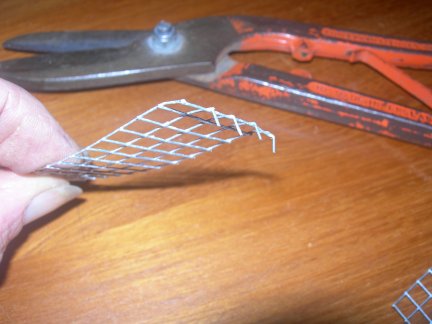
2. Now you have your strips of mesh you need to decide what length your feeders will be. For small feeders I cut the strip into 4 square sections approx (25mm) wide, only this time cut the sheet tight to the other side of the 'square' you are cutting from so as not to leave any of the wire `ribs' sticking out.

For medium cut strips 5 squares wide (35mm), For large, cut strips 7 squares wide (45-50mm) At this point you could file any sharp edges off the ends of the cage. You don't want to cause any damage to a fish should it come into contact with it. I find that if you run your fingers down the edges of the sheet you will find that one side is smoother than the other. (If you have cut with the rib uppermost the rough side is normally underneath). I usually rub mine lightly against a bench grinder to smooth off any sharp edges. (Once the feeder is finished, resting the cage, end up, on a board and tapping lightly with a small hammer will also burr over the edges slightly but I feel happier filing them off).
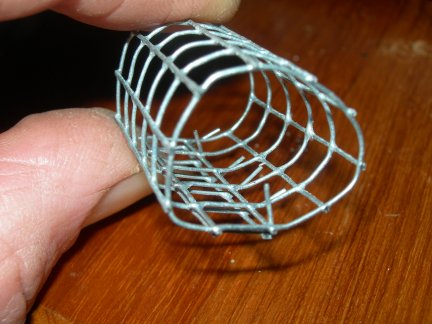
3. Bend the `ribs' that stick out from the end of the sheet approx. 90` (degrees).
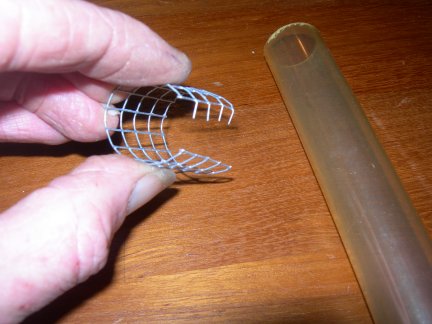
4. Fold/wrap wire sheet around your tube/broom handle/finger/PVA stick loader etc to get the rough shape and then locate the ribs bent at 90` into the sheet making sure to overlap each side by a 'square'. Hold in shape and bend ribs down by pushing flat with sides of long nose pliers. You can do this with your fingers but if you are making a few your fingers will become sore after a while.
5. Cut off at least 6 or 7 inches of Powergum. Fold in half and thread on swivel.
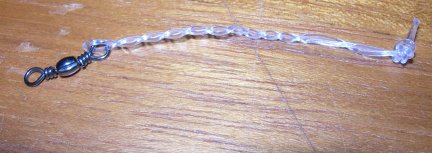
Pinch the Powergum and swivel between thumb and forefinger and twist the Powergum pinching it between your fingers after each turn or twist. I tend to lay one section over the top of the other one turn at a time. I put on approximately 10-15 turns or overlaps. Whilst still holding the twists in position tie an overhand knot in the two free ends of the Powergum. It should look like this.
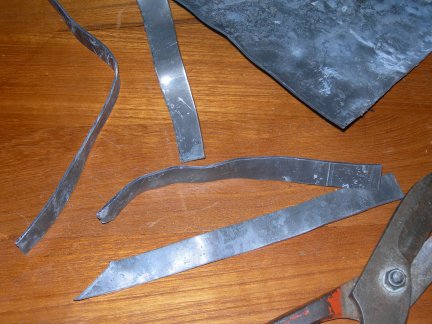
6. Cut some strips of lead from your sheet. I use roofers lead sheet 2mm thick. You can buy this from Builders merchants/roofers. Its not cheap. I paid £30 for a 5metre x 300mm sheet, but that will make thousands of feeder weights and will last a lifetime. Smaller sheets are available eg. 100mm, 200mm etc and in varying lengths. Mine was just surplus to requirements.
For the small feeder : I cut strips 15mm wide and 75mm long, this should be approx 3/4 of an ounce.
For medium : 15 to 20mm wide and 90mm long, approx 1.1/4 oz
For large: 20mm or wider and 90 to 200mm long, approx 2oz if wrapped round twice.
7. Start by folding the lead sheet over one end of the feeder trying to keep the end of the lead sheet in the centre of the feeder and in line with the squares. Squash flat with regular pliers ensuring a tight grip on the mesh. Fold the other end of the sheet thru 90` tight to the opposite end of the feeder and slide on the Powergum twisted loop. You may have to put your thumbnail into the bottom of the loop near the knot to open out some of the twists. Pull the loop down into the bend of the lead ensuring the knot will be trapped central behind the lead when squashed flat. Carefully fold the lead over and squash flat with regular pliers making sure not to damage the Powergum loop. If you want to camouflage your feeders do so BEFORE adding the loop. You can paint them with a spray can if you wish. I have experimented with camo and non camo, marker pens etc and cannot find any difference in catch rates.
Should look like this.....
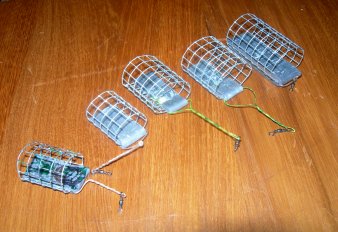
You may just want to start off making one of each size to see what suits your preference. Once you have done this you will be able to see how the finished product looks and whether you need to make bigger/smaller/lighter/heavier. If you are regularly casting medium to long distances you may find that by leaving the 'ribs' sticking out of the ends of the sheet you can bend them over to help grip your ground-bait/loose-feed and prevent it flying out on the cast. I rarely use anything more than a gentle underarm lob so for me this is not an issue. Experiment yourself and more importantly start saving money. Perfect for all of those spare evenings you have during the closed season.
CronkYVoddy
May 2009